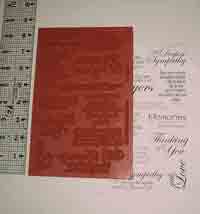
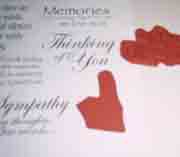
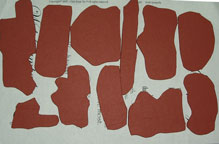
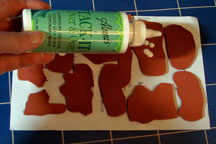
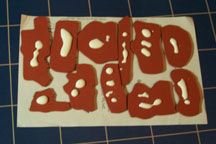
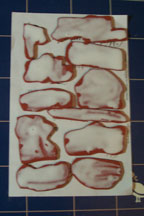
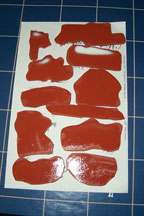
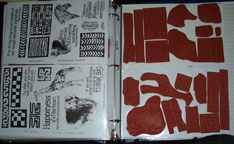
[?] Subscribe To This Site

XML RSS
Add to Google
Add to My Yahoo!
Add to My MSN
Subscribe with Bloglines


Home
Layout Designs New Items Blog
Scrapbook Deals
CUSTOM DESIGNS
Digital Scrapping
LAYOUT GALLERY
Conventions/Expos
70+ Themed Books
CHRONOLOGICAL
MILITARY IDEAS
HONOR FLIGHT
AIR FORCE
NAVY
MARINES
FIREFIGHTERS
COAST GUARD
ARMY
Halloween
Home Decor
Readers Gallery
Sketches & Titles

10 Steps to Getting Started Quick Start Guide
Pick Your Photos
Pick Colors
Pick Your Theme
Papers
Collect Tools
Test Fit Layout
ADHESIVES
Pick Your Album
THINGS TO AVOID

Tools BASIC TOOLS
MORE TOOLS
ALBUMS
GLIMMER MIST
GLITTER PAPER

Organization Supply Organization

Tutorials TUTORIALS
Photo Mattes
Cropping Photos
CHALK
SCISSOR SHAPES
DICROFIBERS
ENCAUSTIC WAX
GLIMMER MIST
Hand Painted Paper
Ink Direct to Paper
IRIS FOLDING
Patterned Papers
Pattern Paper 2
E-BOOKS

Photography Photography Tips

Rubber Stamping RUBBER STAMPING

Embellishments Embellishments
Fibers & Ribbons
Ribbons & Fibers
DIE CUTS
BARGELLO
SPIRELLA
STENCILS
CORE'DINATIONS

Journaling Ideas Journaling
PENS
FONTS
Halloween Ideas

36 Monthly Challenges Book-of-Me Ideas

Cards Card Tutorials
CARD QUICK START
Assembly Line
Card Making Ideas
CHRISTMAS CARDS
Post Your Cards
CARD RESOURCES
Card Don'ts

Scrapbook Kits Photo Mosaics
PAGE KITS
MONTHLY KITS

Merchandise Stores MERCHANDISE
Adhesives
Color Me Paper
Color Wheels
Copic Markers
Core'dinations
CRICUT STORE
Disney Scrappin
DMC Fibers
Encaustic Wax
Fonts Books & CD's
GLIMMER MIST
Anna Griffin
PAPER CUTTERS
Paper Trays
Pens/Calligraphy
POST-IT PAPER
Recipe Scrapboook
Ribbon & Fibers
Rubber Stamps
Rulers
Scoring Tools
Scout Scrapbooks
ScrapOnizer
Storage Binders
Spellbinders
Spirella Threads
STENCIL STORE

Other Items ABOUT US
Contact Us
CUSTOM DESIGNS
Site Map
Favorite Links
CITADEL HEROES
AFFILIATE LINKS
Privacy Policy
HAVE QUESTIONS?

Custom Card Store

Unmounted Rubber Stamps

What Are They?

&

How Do You Get Them Ready to Use?


Unmounted Rubber Stamps are available in sheet rubber about the size of 1/2 sheet of notebook paper or 5 & 1/2 by 8 inches. Normally all of the images on the sheet are in the same family of images.

Mounting Unmounted Rubber Stamps


Prior to use, they first need to be trimmed to the basic shape of the stamp image, and then mounted in one of several ways to clear acrylic blocks.


Trimming of an unmounted rubber stamp sheet should be done with very sharp scissors about 1/8 of an inch from the image, being careful not to cut into the image and not to angle the scissors. Hold the scissors so cutting the edge makes a straight up and down cut - you don’t want to under cut or over cut the edge - it can alter the image at the edge of the stamp or the way the images stamps when you ink it up.

There are several advantages to Unmounted Rubber Stamps. One great advantage is the obvious space that is not taken up by the wooden blocks. Another is that when mounted on clear acrylic, the rubber stamper achieves more accurate placement of the stamped image on the final product. A third advantage is reducing the need for the wood blocks - going "Green"

Unmounted Rubber Stamps can be coated on the back with a thin coat of a repositionable adhesive such as Aleen’s Tack it Over and Over or Liquid Wacky Tac. When “dried” after about 30 minutes (depending on the thickness) the stamps will adhere to the acrylic block and can be inked, used, removed, and even cleaned with a mild soap or stamp cleaner without the “sticky” coming off.

Most clear acrylic blocks are plain, but some have grid lines to aid in stamp alignment. These come in various sizes and shapes, to accommodate large stamps, or multiple stamps on the same block and long slender blocks to accommodate lettering stamps that need to be placed in a straight line.

Tip: If you spill some of the adhesive or get it on you,it can be removed with rubbing alcohol and then washed off. Please be very careful with it. I dropped a bottle of it on my tile floor and I walked right out of my shoes it was so sticky.

The images can be stored on plastic sheet protectors in 3-ring binders with a copy of the image on the facing page. Even more convenient is a 3-ring binder with a zipper close so in case any of the stamps come lose from the sheet protector, they will not get lost.

Unmounted Rubber Stamp Tutorial


Below is a photo review of the process to cut, glue and store Unmounted Rubber Stamps.


Unmounted Rubber Stamps Unmounted Rubber Stamps

Unmounted Rubber Stamps

Unmounted Rubber Stamps (5 & 1/2'" by 8 1/2") sheet with printed stamp images.
Cutting Unmounted Rubber with Small Sharp Scissors - Cut about 1/4 inch from the edge of the image. Place each stamp with the image up-side down to correspond with the printed stamp image sheet.
Unmounted Rubber Stamps Umounted Rubber Stamps Unmounted Rubber Stamps
All images are cut and placed "upside down" over the printed stamp image sheet.  This is a good way to check that you have them all. Using Aleens Tack it Over & Over liquid pressure sensitive glue, place a little on the back of each rubber stamp.
This is how your stampswill look with the liquid pressure sensitive glue before it is spread on the back.  
Unmounted Rubber Stamps Unmounted Rubber Stamps Unmounted Rubber Stamp Storage
Here are 2 pages of the glued unmounted rubber stamps which have been placed on a Sheet Protector and the paper with the printed stamp images inside the sheet protector on the facing side.
This allows you to view all the images you have at a glance and select the ones you want to use.  This particular notebook zips closed so even if the stamps become disconnected, they will not become lost.
Using a small foam brush, not your finger, carefully spread the Aleen's over the back of the rubber stamps.  
CAREFUL! This stuff is VERY STICKY!  And very difficult to get off of anything without Alcohol.
Put your stamps aside until the Aleen's dries and becomes shiny - about 30 minutes. They will not all be dry at the same time.  There is one in the photo in the upper right that is still a little wet.


These particular images were a group of greetings to be used with Sympathy cards, so they were all text images. They were purchased from Club Scrap as were the other images in the book and the zip-close 3-Ring binder.

The Aleen's or Wacky Tac can be purchased at any number of craft stores or through our on-line adhesive store (starting on Page 17) at
Scrapbook-Advice.com Scrapbook Adhesives Store.


Check out our Rubber Stamping page

Go back to the Rubber Stamps Embossing Tutorial

Go to Rubber Stamp Conditioning
to get the best images from your stamps

Check out our Rubber Stamping Tips

Check out our Other Scrapbook Tutorials

Go back to main page for Rubber Stamping

Go to Home Page for general Scrapbooking Advice
from Unmounted Rubber Stamps


The Craft Directory- Arts and Crafts Search Directory Americas Scrapbooking Top Sites Counter


Website Content Protection


Looking For Something on
scrapbook-advice.com?


More Tutorials

Photo Mattes
Cropping Photos
Photo Mosaics
Decorative Craft Scissors
Encaustic Wax Tutorial
Hand Painted Background
Patterned Papers #1
Patterned Papers #2
Chalk
Glimmer Mist
Dicro Fibers
Inking - Direct to Paper
Iris Folding
Bargello
Spirella


Rubber & Acrylic
Stamps

Rubber & Acrylic Stamps
Unmounted Stamps
Stamp Conditioning
Rubber Stamp Embossing
Rubber Stamp Tips & Tricks
Rubber Stamp Store
Michael Strong Stamping
& Embossing Videos


Stencils & Stenciling

Stencil Information
Stencil Store


Card Making

Card Making Tutorials
Hand Made Cards
Card Making Ideas
Christmas Card Ideas from Michael Strong
Card Making Don'ts
Card Makers Resources


Photography Tips

Halloween
Beach
Fireworks


Things to Avoid

Scrapbooking Don'ts
Rubber Stamping Don'ts
Card Making Don'ts
Photography Don'ts


A Great Place to Purchase
all Your Scrapbook Supplies!


Have a Question for
scrapbook-advice.com?

Contact Us