Rubber Stamp Conditioning

It was just a short while ago that I learned how to do Rubber Stamp Conditioning to get them to produce crisper and better images, although I have been using Rubber Stamps for many years in my Scrapbook Layouts and Cards.

More often than not, when I would use a rubber stamp, I would be disappointed in the image. I didn't have many problems with the stamps that were basically lines, but the ones that had large areas of solid or background, the images just wouldn't be crisp or completely filled in.


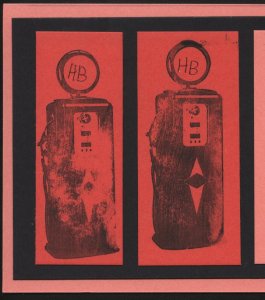
Here is an example of two images of an old fashioned gas pump that I got with the unmounted rubber stamp set from the Club Scrap Cruisin' Kit from August 2008.

A lot of filled in area on these stamps, but the images were just not clear. I could tell what it was supposed to be, but the outcome was disappointing. I used a stamping mat under the paper and was very careful about pressing all over the image.

Rubber Stamp Conditioning


Well, the second one was better than the first. Was the key to practice first on some scrap paper? That was only a partial solution to what I learned later was that I needed to do Rubber Stamp Conditioning.

Rubber Stamp Conditioning


These images below of an old 45 rpm record had the same problem, but they got crisper the more times I stamped the image.


I did some research and found that, like most manufactured items, there is apparently some residue on the face of the stamp, that keeps the ink from evenly covering the image.To better show off your purchased images you need to do some Rubber Stamp Conditioning.

Preparing Rubber Stamps


First - You can try what I accidentally discovered, stamp the image repeatedly on scratch paper until it looks crisper. You may also try twisting the stamp a little on the paper. As you wipe off the ink, you will also be wiping off some of that manufacturing residue. Try stamping again.
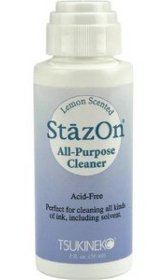
Staz On All Purpose Stamp Cleaner


Second - You can clean your stamp with a stamp cleaner like Staz-On, all purpose stamp cleaner. Staz-On is actually made for cleaning the ink off your stamps after using them, but it is also great for conditioning rubber stamps as it will clean off that residue. It comes in a small 2 oz bottle with an foam applicator top that is just rubbed across the face of the stamp. Wash this off, perhaps even use an old toothbrush or nail brush to get the stamp good and clean.

If you don't have any Staz-On yet, just try some soapy water and a soft brush. Or you can purchase some at the Scrapbook-Advice Rubber Stamp Store - look for the Category that says Stamp Cleaners at the Rubber Stamp Store.

After cleaning, hold the stamp up to the light. If you see some glossy areas, clean again.


Third - Clean the stamp with an eraser. Rub with a large eraser on the rubber side of the stamp. Look at the stamp and see if any of the large areas seem to be glossy. These are probably the areas that are not holding the ink well. Rough these up a little with the eraser. Apply ink to the stamp and check to see if the ink is separating on this area of the stamp, much like water beads up on a waxed car.

Sanding Block for Stamp Conditioning or Paper Distressing


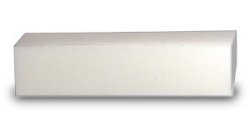
Forth - Clean the stamp with a sanding block. This actually does the same thing as the eraser, but it's a little quicker. And, no, you will not hurt your stamp.

If you need one, they are available in the Scrapbook-advice.com Rubber Stamp Store under the category Sanding Blocks in the Rubber Stamp Store. My favorite is this white one, with a cushion inside. It's about 3 1/2 inches long and about 1 inch square.

Scrapbook-Advice.com Tip: You may also be able to pick up one of these cheaper at a drug store in the aisle that handles nail supplies.


I hope these Rubber Stamp Conditioning
suggestions and the stamp tutorial
will help you make the best
possible images with your stamps.
Happy Stamping!


Go to Rubber Stamping for all sorts of information related to stamps.

Go to Rubber Stamps to learn about the types of stamps available

Go to the Photo Tutorial on Unmounted Rubber Stamps

Go to Rubber Stamp Embossing

Go Back to Home Page for general Scrapbook Advice
from Rubber Stamp Conditioning


Looking for Something
on our Site?

Website Content Protection


More Tutorials

Alcohol Ink
Photo Mattes
Cropping Photos
Photo Mosaics
Decorative Craft Scissors
Encaustic Wax Tutorial
Hand Painted Background
Pendant Jewelry Tutorial
Patterned Papers #1
Patterned Papers #2
Chalk
Glimmer Mist
Dicro Fibers
Inking - Direct to Paper
Iris Folding
Bargello
Spirella


Rubber & Acrylic
Stamps

Rubber & Acrylic Stamps
Unmounted Stamps
Stamp Conditioning
Rubber Stamp Embossing
Rubber Stamp Tips & Tricks
Rubber Stamp Store
Michael Strong Stamping
& Embossing Videos


Stencils & Stenciling

Stencil Information
Stencil Store


Card Making

Card Making Tutorials
Hand Made Cards
Card Making Ideas
Christmas Card Ideas from Michael Strong
Card Making Don'ts
Card Makers Resources


Photography Tips

Halloween
Beach
Fireworks


Things to Avoid

Scrapbooking Don'ts
Rubber Stamping Don'ts
Card Making Don'ts
Photography Don'ts


A Great Place to Purchase
all Your Scrapbook Supplies!


Have a Question for
scrapbook-advice.com?

Contact Us