Pendant Jewelry Tutorial

Pendant Jewelry Rectangle made with Pearl Lacquer Paints

Here you will learn just how easy and quick they are to do in this Pendant Jewelry Tutorial. It takes very few supplies and very little time to make these gorgeous jewelry pendants.

Pendant Jewelry Supplies


1. Pearl Lacquer Paint, Ranger Liquid Pearls or Viva Pearl Pens.

2. Jewelry Pendant Findings that have a lip on the edge.

3. A Toothpick, pointy tool, straight pin or large safety pin.

4. Galaxy Glaze, Diamond Glaze by Judikins, or Sakura's Crystal Lacquer.

You probably already have item 1 and 4 in your scrapbook stash, and the toothpick or pointy things shouldn't be very hard to find either.

So basically, you will need to come up with some appropriate Jewelry findings.

This is what I used for the Pendant Jewelry Tutorial.

Pendant Jewelry Shapes for use with Pearl Lacquer Paints

The Jewelry Pendants which came in a 1 & 1/2 " Round Diameter Silver, 1" x 1 & 1/2" Rectangle Silver, and 2" x 2" Square Silver. I received 5 pendants of each shape in the Jewelry Kit I purchased.

Each one has a small lip around the edge which holds the paint that will be applied. I have found these types of pendants from a company called Patera in differents sizes, shapes and metals. You can find the Patera Jewelry findings in our Jewelry Pendant Store.

Jewelry Pendant Kit colors of Pearl Lacquer


These 6 colors of Pearl Colored Lacquer that I used for the Pendant Jewelry Tutorial came with the Primary Color Kit and are called Natural (looks like Silver) Red, Black (looks like Dark Grey), Lavender, Green and Cobalt Blue. This should also work with the Viva Pearl Pens or Ranger Liquid Pearls in any colors you happen to like and want to put together.

Jewelry Pendant Tutorial


Step 1.   Start with a pendant of your choice.  Here I started with the Round one. Jewelry Pendant 1&1/2" Diameter Round Silver


Pearl Lacquer on Jewelry Pendant Step 2.  Pick one of the Pearl Lacquer colors and squeeze a blob of it onto the center of the round pendant. This was about the size of a pencil eraser or maybe a little bigger. 

Plan to use about 3 or 4 coordinating colors.  Here I used the Cobalt Blue.

The Pendant has a small lip around the edge to contain the Pearl Lacquer.  Keep in mind you do not want to add too much of the lacquer so that it will not overflow the edge of the pendant.
Jewelry Pendant with 2 colors of Pearl Lacquer Step3.   Squeeze out another color next to the original and touching the edges of the original lacquer.  The colors will spread out a little, depeding how much you use.

Here I used the Green.
Jewelry Pendant with 3 colors of pearl lacquer Step 4.   Put another ring of the Pearl Lacquer around the first 2.

Here I used the Natural, which appears light blue on this photo, but was really what I call Silver.
Jewelry Pendant filled with 3 colors of Pearl Lacquer Step5.  I added the Cobalt Blue around the outside and filled in the rest of the pendant.  My lines of paint are not perfect, but they are beginning to touch each other.

I have not been particularly careful with the width of the rings of the Pearl Lacquer as you can see from these photos, but I did take it to fill in to the edge of the pendant lip.
Jewelry Pendant using the toothpick to drag the colors into shapes Step6.  Using the pointed wooden toothpick, insert into the center of the pearl lacquer and drag it through the paint to the outside edge.  You can drag it straight, but I used a curving motion going in a clockwise direction.  See Below.
Pendant Jewelry with pearl lacquer finishing Step 7.   The Colors are swirling following the path of the toothpick.  Repeat this process a number of times until you have gone around the pendant or until you are ready to stop.

If the Pearl Lacquer goes over the lip of the pendant, wipe it off with a paper towel, or just your finger.  Don't let it dry on the outside of the lip.
Jewelry Pendant Finished Look Step 8.   Here is the finished pendant after dragging the Pearl Lacquer at various intervals all the way around the pendant.   I think I did that about 10 times but it would vary on the size of the pendant and your creativity.

Keep the pendant flat to let it dry. I would say let it dry for several hours, preferably overnight.

The last step in the Pendant Jewelry Tutorial is to finish off or seal your pendant. When the pendant has completely dried, apply some of the Galaxy Glass to fill in and smooth out the paint up to the lip around the edge.  This will protect your design from getting chipped and from fading. Again, it will need to dry completely before wearing it.

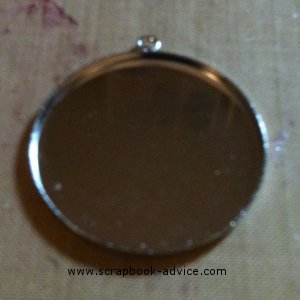
Using the Square Jewelry Pendant -
Alternative Pendant Jewelry Tutorial.


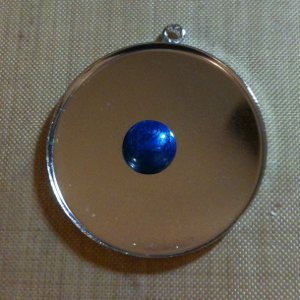
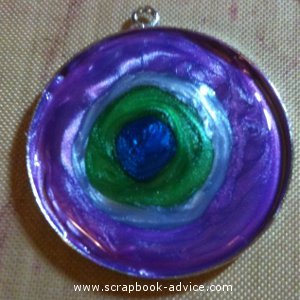
Step 1.  Here I applied the Cobalt Blue Pearl Lacquer in strips across the pendant from edge to edge.

I spaced them out evenly with plans to add two more colors.
Square Jewelry Pendant application of Pearl Lacquer
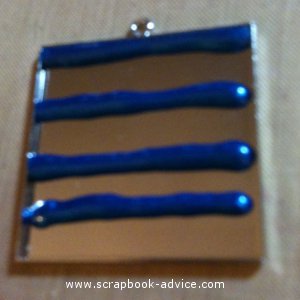
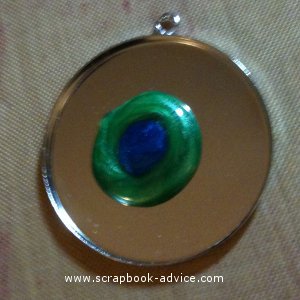
Step 2.  I have added strips of the Green Pearl Lacquer and then the Natural (Silver) in the same order as the first strips. Jewelry Square Pendant with 3 colors pearl lacquer added
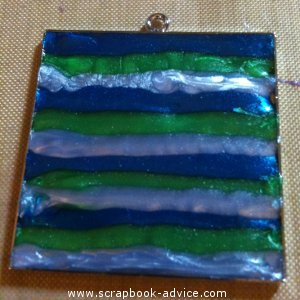
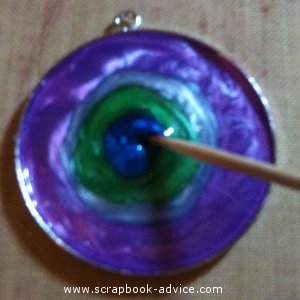
Step 3.  Dragging the toothpick from the top of the pendant just under the ring down to the bottom, cutting the pendant into 2 equal parts.  The toothpick drags the strips of paint into angles.

To complete this design, I dragged the tooth pick from bottom to top about 1/4" inch to the side.  Alternating directions with each drag of the toothpick.

Square Jewelry Pendant Finished


Finished Jewelry Pendant using Pearl Lacquer 
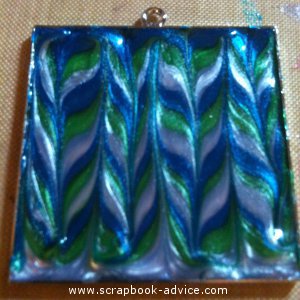
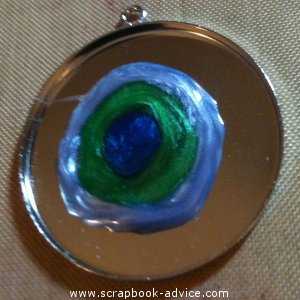
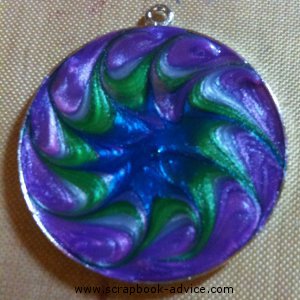
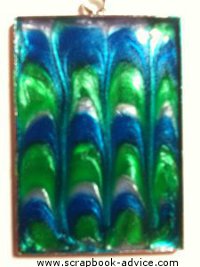
Here I used the same colors as the Pendant above, but I only dragged the toothpick from top to bottom, instead of alternating top to bottom and bottom to top.


Here are all the Pendants made from one small kit.

Completed Jewelry Pendants from Jewelry Kit using Pearl Lacquer Paints


Naturally, any of these that you make for your self will come out different from the one before.   I hope you have enjoyed our Pendant Jewelry Tutorial and learning how to make these. If you are looking to purchase a kit, or the individual products to do these, you can find them at our

Pendant Jewelry Findings Store.

See more detail on the finished pendants at Jewelry Pendant Kits.

Check out more Scrapbook Tutorials & Techniques

Home Page for all Scrapbook Advice from Pendant Jewelry Tutorial


Looking for Something
on our Site?

Website Content Protection


More Tutorials

Alcohol Ink
Photo Mattes
Cropping Photos
Photo Mosaics
Decorative Craft Scissors
Encaustic Wax Tutorial
Hand Painted Background
Pendant Jewelry Tutorial
Patterned Papers #1
Patterned Papers #2
Chalk
Glimmer Mist
Dicro Fibers
Inking - Direct to Paper
Iris Folding
Bargello
Spirella


Rubber & Acrylic
Stamps

Rubber & Acrylic Stamps
Unmounted Stamps
Stamp Conditioning
Rubber Stamp Embossing
Rubber Stamp Tips & Tricks
Rubber Stamp Store
Michael Strong Stamping
& Embossing Videos


Stencils & Stenciling

Stencil Information
Stencil Store


Card Making

Card Making Tutorials
Hand Made Cards
Card Making Ideas
Christmas Card Ideas from Michael Strong
Card Making Don'ts
Card Makers Resources


Photography Tips

Halloween
Beach
Fireworks


Things to Avoid

Scrapbooking Don'ts
Rubber Stamping Don'ts
Card Making Don'ts
Photography Don'ts


A Great Place to Purchase
all Your Scrapbook Supplies!


Have a Question for
scrapbook-advice.com?

Contact Us